Because Alchemer Email Campaigns create unique links for each contact there are a number of benefits to using email campaigns to share your survey including respondent tracking, built-in duplicate protection, and save and continue. If you are looking to take advantage of each of these benefits but wish to send out invites through another system, you can do so! Keep reading to learn how.
Setup
First thing's first, you will need a spreadsheet of all of your contacts with their email address and any other contact information you wish to include.
Next, you'll want to start by creating an Email Campaign and uploading your list of contacts. To do so:
- Go to the Share tab and click Send via Email Campaign.
- Next, access the Contacts screen of the campaign.

- On the Contacts tab click Add Contacts > Upload a Spreadsheet and select the spreadsheet with your contacts. Click Continue.
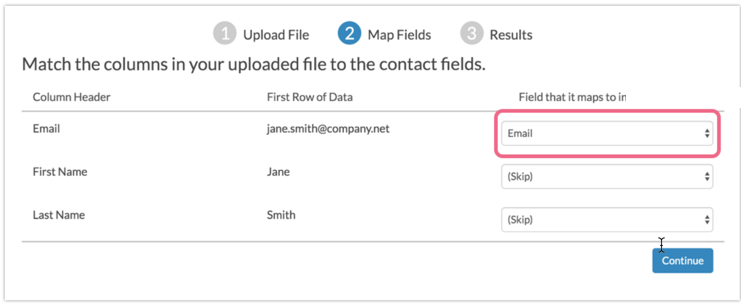
- On the Map Fields page, map the data in your spreadsheet to the contact fields within Alchemer. To create a unique link for each contact all you will need is the email address. If you wish to bring in other contact information to use in the survey you can do so. When you are finished mapping scroll to the bottom of the page and click Save Fields.
 This will bring you back to the Contacts tab where you will see your contacts once they are uploaded. For each contact Alchemer will have generated a unique link to the survey. Now you'll want to obtain these unique survey links.
 - To obtain the unique links, scroll to the bottom of the Contacts page and click the link to Export Contacts with Send Status. Once it is downloaded, open the spreadsheet and find the Invite Link column. These are the unique survey links that are generated for each contact. It is important to note that each invite link is associated with the email address in the same row.
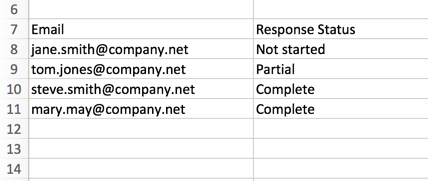
 With this information you can now do a mail merge into another system to invite your contacts to participate in your survey! Once responses start to roll in you can re-export your status log to determine who has responded to your survey. For each email address you uploaded you will have a Response status of Not started, Clicked, Partial, or Complete.
Send Reminders Via Another System
If you've chosen to send out invites via another system you might think that you don't have the option to send reminders. Don't fret! To send a reminder you'll first need to figure out which contacts are eligible for reminders.
In the Alchemer system all contacts who have not completed the survey are eligible to receive a reminder.
- To obtain this information go to the Delivery Statistics step of the Email Campaign that you created to generate your unique links and click Export Contacts with Send Status.

- Download and open the spreadsheet. Sort your spreadsheet by the Response Status column. All contacts with either a Not Started or Partial Response Status have not completed your survey and thus can be sent a reminder. With this information you can now do a mail merge into another system to remind your contacts to participate in your survey!
Pairing Responses with Email Addresses
One of the primary reasons you might use unique links from our Email Campaigns is that it gives you the ability to pair each email address with the response once you've collected data. Below we'll cover the various ways you can do so.
Individual Responses
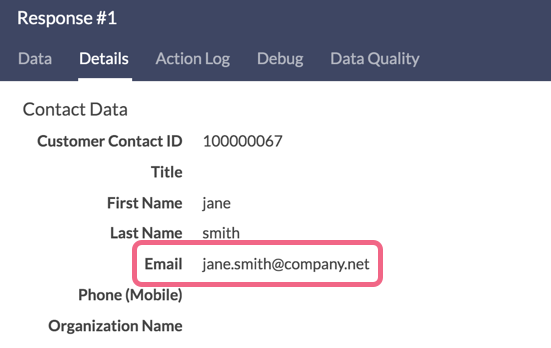
Within each individual response, found under Results > Individual Responses, on the Details tab you will see the Email listed under the Contact Data section.

Status Log
On the Contacts and Delivery Statistics sections of the Email Campaign you used to generate your unique links, click the option to Export Contacts with Send Status to export your status log. Once responses start coming in the Response ID column of your Status Log will populate. The Response ID can be used to find the response for each email address you sent your survey to in both an Export and Individual Responses.

CSV/Excel Exports
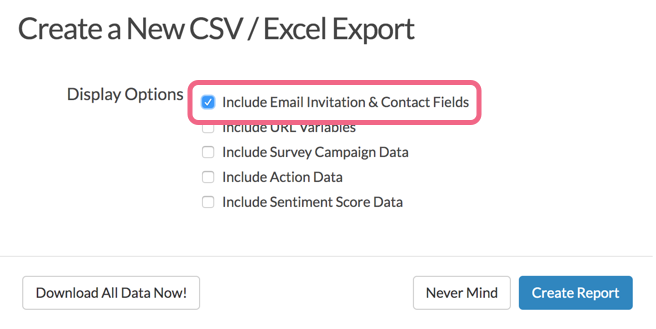
You can also pair the full response with each email address in an Export. To do so (once your responses start rolling in), create a CSV/Excel Export and select the option to Include Email Invitation & Contact Fields.


 This will bring you back to the Contacts tab where you will see your contacts once they are uploaded. For each contact Alchemer will have generated a unique link to the survey. Now you'll want to obtain these unique survey links.
 With this information you can now do a mail merge into another system to invite your contacts to participate in your survey! Once responses start to roll in you can re-export your status log to determine who has responded to your survey. For each email address you uploaded you will have a Response status of Not started, Clicked, Partial, or Complete.
