The Alchemer platform will assist you in complying with General Data Protection Regulation (GDPR) requirements. Visit Alchemer's GDPR Command Center for additional information.
Privacy Notice and Opt-In Consent
Thanks to our advanced privacy notice and opt-in consent process, our platform enables survey respondents to clearly understand how their data will be used, and have the ability to easily consent to the collection of their data.
This consent is then stored as an “artifact” that can be easily referenced should data collection authorization be questioned.
Configure Privacy Notice and Opt-In Consent
Within Alchemer, an Account Administrator can configure a Privacy/Data Use Policy for use on all surveys in the account. The admin can then require use of the configured policy on all surveys.
Not sure what you should include in your Privacy/Data Use Policy?
Review the Information Commissioner's Office (ICO) documentation concerning Lawful basis for processing and Consent.
- Once a Privacy/Data Use policy has been configured and enabled for surveys, a consent checkbox will be displayed to respondents in the survey footer, just above the Next/Submit button. For mobile surveys, the consent checkbox will be in the footer.
- Respondents will be required to consent to your policy before proceeding with your survey. Should a respondent elect to not consent to your policy, they will not be able to proceed in your survey.
- After consenting, respondents will be able to refer to your policy via a link in the footer on subsequent survey pages.
- The Alchemer Privacy Policy will also be available to survey respondents when they click to view your policy.
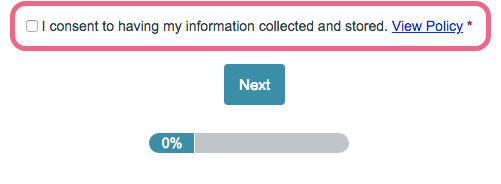
Privacy/Data Use Policy Setup
- To configure an account-wide Privacy/Data Use Policy, navigate to Account > Summary > Account Defaults. The Privacy/Data Use fields can be found at the bottom of the page.
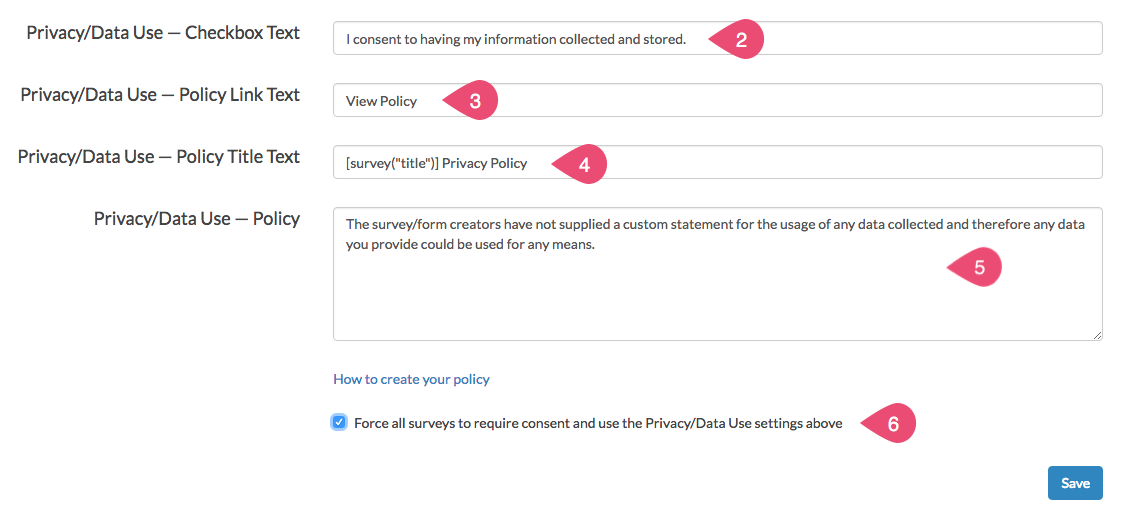
- Start by supplying the Checkbox Text. This is the text that the respondent will see next to the consent checkbox. Make sure to keep this text short, especially if you expect to have respondents taking your survey on mobile devices.

- Next, you have the option to customize the Policy Link Text. This is the text of the link that the respondent can click on to view your policy. The default for this link text is View Policy.

- You can then customize your Policy Title Text. This is the text that will appear at the top of your policy. By default, this text includes the survey title and the words Privacy Policy.

- Last, you will want to customize the actual Policy text to indicate how you plan to use the supplied respondent data. How to create your GDPR policy?

- Now that you have customized the provided fields, you have the option to force this policy to be used on all surveys created on your account. To do so, select Force all surveys to require consent and use the Privacy/Data Use settings above. This setting applies to all surveys on your account, including surveys that have already been created*.
- Make sure to Save your settings to finish!
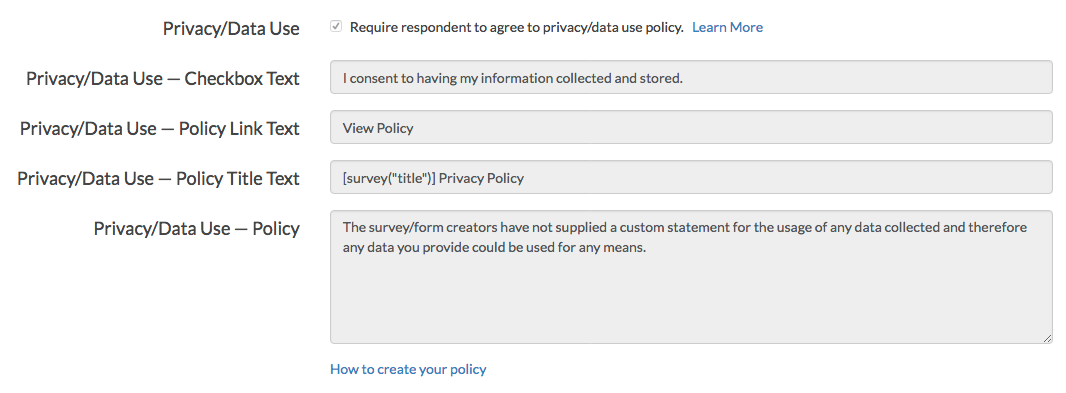
*With the Force all survey to require consent... setting enabled, the Privacy/Data Use policy cannot be customized on a per-survey basis. The policy will be visible within a survey by accessing Tools > Response Settings. The fields here will be read-only.
Configure Policy for a Single Survey
If you do not require a Privacy/Data Use Policy for all surveys in your account, a policy can be configured on a per-survey basis.
- Within the survey, navigate to Tools > Response Settings. The Privacy/Data Use fields can be found at the bottom of the page.
- Select Require respondent to agree to privacy/data use policy.
- If an account wide policy has been configured, you will see the customized text in the fields provided. If you do not need to make changes, click Save Settings at the bottom of the page to finish.
- If an account-wide policy has not been configured (or if you need to make customizations to the existing policy), you can customize the policy fields here. Review the customization steps above. Save Settings to apply your changes.
Translate Privacy/Data Use Policy Fields
If you are running surveys in multiple languages, you will likely want to translate your Privacy/Data Use fields for each language version of your survey.
- To translate the Privacy/Data Use fields for a given survey, click on Tools > Text & Translations.
- Click on one of the language versions of your survey and access the Messages tab.
- Scroll to the Privacy/Data Use Messages section and Edit the available fields one-by-one to provide the necessary translations.
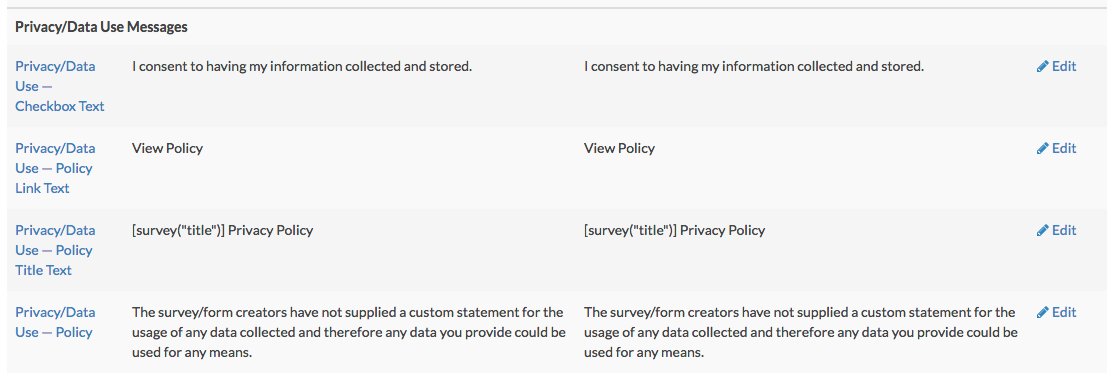
- Repeat this process for any additional language versions of your survey.
Accessing Stored Consent
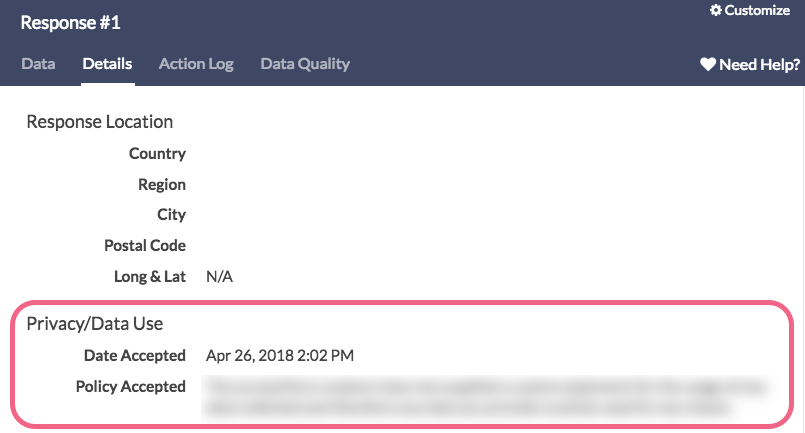
If you have enabled a Privacy/Data Use Policy for a survey, you can view the following details about a respondent's acceptance of your policy:
- Date Accepted - the date and time that your policy was accepted by the survey respondent
- Policy Accepted - the specific wording of the policy that was accepted by the survey respondent
- To view this policy information, navigate to Results > Individual Responses.
- Locate the response in question and click on the response to view it.
- Click the Details tab and scroll to the Privacy/Data Use section to view the Date Accepted and Policy Accepted information for that respondent.
Existing Respondent Data can be Deleted
Our platform is set up to allow for existing respondent data to be deleted.
- Under Results > Individual Responses you can review each of your individual responses. Delete responses one-by-one by clicking the trash bin icon on the far right in the response list.
- Select multiple responses to delete using the checkboxes to the left of each response. Then scroll to the top of the list and click the Delete button.
Note: Deleting responses this way does allow for response to be restored.
To permanently delete response data, follow the permanent deletion process. Deleting responses is an available feature included in all license types.
Warning: Once responses have been permanently deleted, they cannot be recovered!
Visit additional content on the following topics:
Track Respondent Email Unsubscribe Requests
Track respondent email unsubscribe requests and import them into other systems to ensure that you are in compliance with the various applicable regulations.
An unsubscribed contact will not receive further invites from any campaign or surveys in the account. This is true regardless of how the contact was added to a given campaign (e.g. uploaded to the campaign itself versus imported from email lists).
A contact can unsubscribe by clicking the unsubscribe link in a survey invitation email, or can be unsubscribed by you from within Alchemer. To unsubscribe a contact within Alchemer, go to the Contacts page of your email campaign, search for contact’s email address and click to edit. On the Contact Info tab change the Subscription status to Unsubscribe.
Customers Can Exercise All or Any of Their Individual Rights Under GDPR
Individual subjects can request any or all of their GDPR individual rights on their data through multiple systems and processes -- via phone, email, or through our main website.
Survey Responses Can be Anonymized
Survey responses can be anonymized to ensure that submitted information is not connected to a natural person.
To configure your survey to collect anonymous responses:
- Within the survey, navigate to Tools > Response Settings.
- Select the Anonymous Responses option.
Visit our documentation for step by step instructions and additional details.
Note: The Anonymous Responses setting is locked once your survey records at least one response. This means that if you set your survey to be anonymous and collect any data, you will not be able to disable the anonymous setting.
Sources
Information Commissioner's Office (ICO) Guide to the General Data Protection Regulation (GDPR)


